This functionality allows you to import invoices that have been entered into a generic .csv format which matches the fields that Idealpos can accept.
Note!
Older builds of Idealpos previously required a User-Defined option to be created so that the Generic Format options could be used. This is no longer the case.
There are two types of Generic Formats:
The following links outline each Generic Format in greater detail.
The Generic1.csv format is hard-coded to only support the following fields in the exact order as shown in the below example:
CODE,DESCRIPTION,UNITCOSTEX,QUANTITY,SCANCODE,SELLPRICEINC,DEPARTMENT
CO011581,Hanging Dehumidifier 210g,0.75,36,9328644011581,1.99,XMAS
The Generic1.csv File Headers are mapped as follows:
CODE - This maps to the Stock Item's Stock Code field. When importing a Supplier Invoice using the Generic1.csv format, the Stock Item's CODE will NOT create or populate the Supplier Code for the Stock Item.
DESCRIPTION - This maps to the Stock Item Description 1 field in the Stock Item. When importing a Supplier Invoice using the Generic1.csv format, the Stock Item's DESCRIPTION will only populate the Description 1 field in Idealpos; the Stock Item's Description 2 and Description 3 fields will NOT be populated.
UNITCOSTEX - This maps to the Unit Cost/Last Cost.
QUANTITY - This maps to the Quantity in the Stock Received/Supplier Invoice (the Quantity that is ordered/in the Supplier Invoice). E.g. If this field in the Generic1.csv Supplier Invoice is 20 and the UnitCostEx is 1.00, the Total Cost will be 20.00.
SCANCODE - This maps to the Stock Item's Scan Code field.
SELLPRICEINC - This maps to the Stock Item's Sell Price field.
DEPARTMENT - This maps to the Department field in the Stock Item. The Department specified in this field in the Generic1.csv Supplier Invoice will be matched with the Department in Idealpos. If the Department specified in this field does not exist in Idealpos, the Department will be created automatically when the Supplier Invoice is imported.
The Generic2.csv format supports the following fields in any order:
QTY,QUANTITY
DESC,DESCRIPTION
CODE,ITEMCODE
SCAN,SCANCODE,BARCODE
SELL,SELLPRICE,RRP
COST,UNIT,UNITCOST,COSTEX
DPT,DEPARTMENT,CATEGORY
DISCOUNT,DISC
The below example shows a Generic2 CSV Format in a spreadsheet view.
Some of the data shown in the first row of the Generic2.csv File Format is mapped and passed through to Idealpos when the Generic2.csv Supplier Invoice is imported.
For the purpose of outlining the mapping from the first row of the Generic2.csv File Format, the Spreadsheet Cell References will be used to describe the mapping as follows:
A1 - This is the Invoice Number and will be mapped to the Invoice No in the Idealpos Stock Receive.
B1 - This is the Date of Invoice/Stock Process Date and will be mapped to the Date of Invoice/Stock Process Date in the Idealpos Stock Receive.
C1 - Not used/ignored.
D1 - Not used/ignored.
E1 - Not used/ignored.
F1 - Not used/ignored.
G1 - Not used/ignored.
On the second row of the Generic2.csv File Format, the Headers are mapped as follows:
QTY - This is the total quantity of the Stock Item received. This maps to the Quantity in the Stock Received/Supplier Invoice (the Quantity that is ordered/in the Supplier Invoice). E.g. If this field in the Generic2.csv Supplier Invoice is 20 and the Cost is 1.00, the Total Cost of the item will be 20.00.
CODE - This maps to the Supplier Code in the Stock Received. It also maps to the Default Supplier Stock Code field within the Stock Item.
RRP - This maps to the Sell Price field in the Stock Item. If the Location the Invoice has been imported to include this POS Terminal, that specific Price Level will be updated against each Stock Item.
Description - This maps to the Description 1, Description 2 and Description 3 fields in the Stock Item.
Cost - This maps to the Unit Cost in the Stock Received and the Last Cost in the Stock Item. Note - The Stock Item's Last Cost will only be updated after the Stock Received has been processed.
Barcode - This maps to the Stock Code field in the Stock Item. Note - When importing a Generic2.csv File Format Supplier Invoice, the Scan Code field in the Stock Item is NOT populated using the value from the Barcode field in the import file.
Category - This maps to the Department field in the Stock Item. The Department specified in this field in the Generic2.csv Supplier Invoice will be matched with the Department in Idealpos. If the Department specified in this field does not exist in Idealpos, the Department will be created and the new Department will be linked to the Code 1 Sales Category.
The following are a set of four sample Generic2 files and formats (where the Supplier Name = BIDVEST):
Sample File 1
Filename:
BIDVEST^INV 23456.CSV
File Contents:
23456,19/09/2016,,BIDVEST - LOC1 Inv 23456 (19/09/2016),,,
Qty,Code,RRP,Description,Cost,Barcode,Category
1,101001,$4.32,Gun Sock,$6.21,234234234,LUNCH
1,101002,$5.21,MAGNUM,$7.41,132131232,MAIN
Sample File 2
Filename:
BIDVEST^INV 23457.CSV
File Contents:
23457,18/09/2016,,BIDVEST - LOC1 Inv 23457 (18/09/2016),,,
Qty,Code,Description,Cost,Barcode,Category
1,101001,Gun Sock,$6.21,234234234,LUNCH
1,101002,MAGNUM,$7.41,132131232,MAIN
Sample File 3
Filename:
BIDVEST^INV 23458.CSV
File Contents:
23458,17/09/2016,,BIDVEST - LOC1 Inv 23458 (17/09/2016),,,
QTY,CODE,DESC,COST,SCAN,DPT
1,101001,Gun Sock,$6.21,234234234,LUNCH
1,101002,MAGNUM,$7.41,132131232,MAIN
Sample File 4
Filename:
BIDVEST^INV 23459.CSV
File Contents:
23459,16/09/2016,,BIDVEST - LOC1 Inv 23459 (16/09/2016),,,
QTY,CODE,DESC,COST,SCAN,DPT
1,101001,Gun Sock,6.21,234234234,LUNCH
1,101002,MAGNUM,7.41,132131232,MAIN
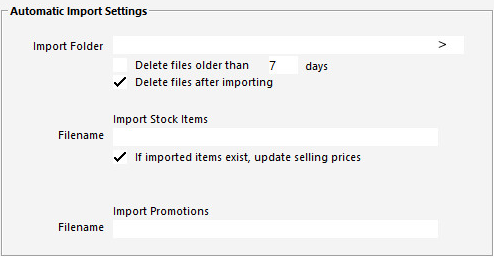
The Automatic Import Settings section will need to be configured so that data can be imported automatically.
E.g. Select a folder where data will be automatically imported and specify the filenames where data such as Stock Items and Promotions will be imported from.
Go to: Back Office > Setup > POS Terminals > Modify > Automatic Import Settings
Import Folder - This is the folder that Idealpos will look inside and automatically import any files containing Supplier Invoices, Stock Items or Promotions. If required, create the folder first, then specify the location to the folder here.
Supplier Invoices will be imported using the settings that are configured in the next section 'Supplier Invoices'.
Delete files older than # days - This option can be enabled and the number of days set. Any files that are older than the number of days specified here will be deleted automatically.
Delete files after importing - If this option is enabled, files will be deleted after they've been imported.
Filename [Import Stock Items] - This field is used for specifying the name of the file that contains the Stock Items which will be imported. For further details about the Stock Item Import File Format, click here.
If imported items exist, update selling prices - When Stock Items are imported via the Automatic Import function, if those Stock Items already exist and this option is enabled, the Selling Prices of those items will be updated using the Sell Prices from the Import File.
Filename [Import Promotions] - This field is used for specifying the name of the file that contains the Promotions which will be imported. For further details about the Promotion Import File Format, click here.
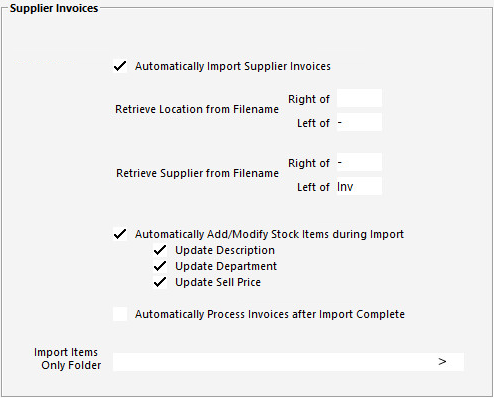
The Supplier Invoices section enables the configuration of settings that are required for Idealpos to import Supplier Invoices.
When importing a Supplier Invoice, the Idealpos Stock Location and Supplier Name must be included within the filename of the Supplier Invoice (e.g. Location 1 - ALM.csv).
The Location and Supplier Name is then retrieved from the filename and used to import the data as per the values entered in the Right of/Left of settings configured in the Retrieve Location/Supplier from Filename.
The following settings are available:
Automatically Import Supplier Invoices - Enable this checkbox to automatically import Supplier Invoices. Supplier Invoices will be imported automatically using the Retrieve Location/Supplier from Filename settings below.
Retrieve Location from Filename - The values entered into the below 'Right of' and 'Left of' fields will be used to extract the Location from the Supplier Invoice filename.
Right of - Enter the character that appears to the right of the location in the filename.
Using the
Left of - Enter the character that appears to the left of the location in the filename.
Retrieve Supplier from Filename - The values entered into the below 'Right of' and 'Left of' fields will be used to extract the Supplier from the Supplier Invoice filename.
Right of - Enter the character that appears to the right of the Supplier in the filename.
Left of - Enter the character that appears to the left of the Supplier in the filename.
Automatically Add/Modify Stock Items during import - This checkbox (and the Update Decription/Department/Sell Price checkboxes below) only apply when Importing Stock Items from a Supplier Invoice via the Import Items Only folder configured below. Enabling this option will add/update the Stock Items in the Idealpos database using the records from the import file placed in the Import Items Only folder configured below, except for Description, Department and Sell Price. If the user requires the Description, Department and Sell Price to be updated when importing Stock Items from a Supplier Invoice via the Import Items Only, enable the checkboxes as required below.
Update Description - Enable this option to update the Stock Item Descriptions in the Idealpos database using the details in the import file.
Update Department - Enable this option to update the Stock Item Departments in the Idealpos database using the details in the import file.
Update Sell Price - Enable this option to update the Stock Item Sell Prices in the Idealpos database using the details in the import file.
Automatically Process Invoices after Import Complete - When this option is enabled, Idealpos will automatically process the Invoices after they're automatically imported. If enabled, there will be no opportunity to check the invoices nor make any amendments to the invoice before it is imported. If disabled, each Invoice that is imported will need to be manually processed via Back Office > Transactions > Stock Control > Stock Purchases.
Import Items Only Folder - This field is used for configuring the Import Items Only Folder. When a folder location is specified in this field, Idealpos will only Import Stock Items from Invoices located in this folder. The Invoices themselves will not be imported when they are placed into this folder. To import the Invoices, copy them into the Import Folder configured in the Automatic Import Settings section configured above.
When a Supplier Invoice with a filename of 'Location 1-XYZ INV 123.csv' is imported using the following Retrieve Location from Filename settings...
Setting | Value |
Retrieve Location from Filename - Right of | |
Retrieve Location from Filename - Left of | - |
The Location that is retrieved is highlighted yellow in the filename below...
Location 1-XYZ INV 123.csv
If the Location in the filename does not match any Locations in Idealpos, the Supplier Invoice will be matched to the first Location that is available.
Note!
When importing the Supplier Invoice, the Location Description in the filename will be matched to a Location Description in the Idealpos database and the invoice will be created for the matched Location.
The Supplier Invoice will not be matched using the Location Code.
E.g. A Location exists in the Idealpos database as follows:
Location Code - 1
Location Description - Basement
If a Supplier Invoice is being imported and the Location of the Supplier Invoice needs to be matched with the Basement Location shown above, the Supplier Invoice filename should include the Location's Description in the filename as follows:
Basement-XYZ INV 123.csv
When a Supplier Invoice with a filename of 'Location 1-XYZ INV 123.csv' is imported using the following Retrieve Supplier from Filename settings...
Setting | Value |
Retrieve Supplier from Filename - Right of | - |
Retrieve Supplier from Filename - Left of | Inv |
The Supplier that is retrieved is highlighted yellow in the filename below...
Location 1-XYZ INV 123.csv
Note!
When importing the Supplier Invoice, the Supplier in the filename will be matched to a Supplier Code or Supplier Name in the Idealpos database.
If a Supplier Code or Supplier Name in the Idealpos database cannot be matched to the Supplier in the filename, the Supplier Invoice will remain in the folder and an entry will continue to be written to the SupplierInvoiceImport.log file until the Supplier is created or until the
Supplier Invoice is removed from the folder.
The entry recorded in the SupplierInvoiceImport.log file will list the Supplier Name that was extracted from the Invoice filename and not found in the Idealpos database.
The SupplierInvoiceImport.log file can be found in the folder location - C:\ProgramData\Idealpos Solutions\Idealpos\LOGS\.
The Retrieve Location/Supplier from Filename Right of/Left of settings shown in the above examples are entered into the Supplier Invoices configuration as follows:
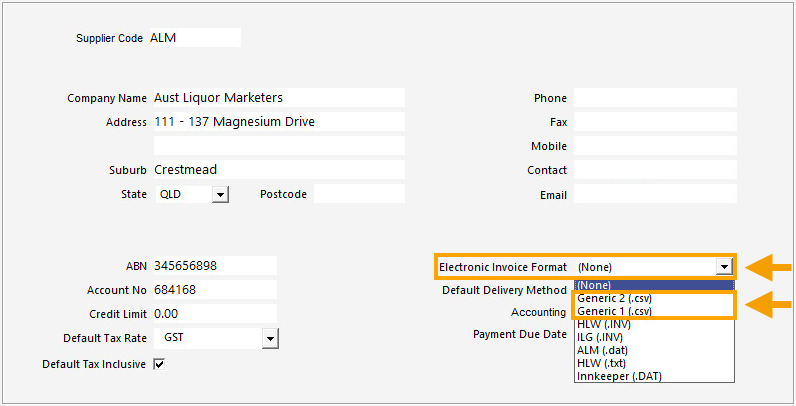
The final step that needs to be completed before importing Supplier Invoices is to select the Electronic Invoice Format for each of your Suppliers.
If the Suppliers don't exist, create them accordingly, ensuring that the correct Electronic Invoice Format is selected so it matches the Generic format that is being imported.
When creating Suppliers in Idealpos, ensure that the Supplier Code or Supplier's Company Name match the Supplier Code/Supplier's Company Name that will be included in the filename of the Supplier Invoices.
The Electronic Invoice Format selected for each Supplier must correspond to the Generic Import Format that will be imported for that Supplier (as outlined above).
Go to: Back Office > File > Suppliers > Suppliers > Add/Modify > Electronic Invoice Format > Select the required format.